[Repost] Inside Windows Page Frame Number (PFN) – Part 1

Inside Windows Page Frame Number (PFN) – Part 1

Introduction (Page Frame Number)

Windows and almost all the OSs use Page Frame Number Database in order to have a track of virtually allocated pages to know which page must be freed or evicted or if a page needs to be cached and etc. All of these kinds of stuff manages through a list, called Page Frame Number (PFN). A long list of explanation about the states of every physically and virtually allocated pages and its corresponding attributes. In the rest of this post, I’ll explain Windows implementation of Page Frame Number with lots of practical examples, the following part describes basic concepts implementations, you should also read the next part in order to see how you can use or change these attributes. If you’re familiar with non-PAE mode and PAE mode systems then I should note that in a non-PAE mode every PFN structure takes 24 bytes while in a PAE mode system this size increases to 28 so if your pages are 4096 bytes then allocates about 24 bytes more to keep tracks of every page. As you can see here:

In non-PAE mode 24 bytes in the PFN database represents each 4 KB page of physical memory – this is a ratio of 170:1. In PAE mode 28 bytes represents each 4 KB page of physical memory – this is a ratio of 146:1. This means that roughly 6 MB or 7 MB is needed in the PFN database to describe each 1 GB of physical memory. This might not sound like much, but if you have a 32-bit system with 16 GB of physical memory, then it requires about 112 MB of the 2 GB of kernel virtual address space just to address the RAM. This is another reason why systems with 16 GB of physical memory or more will not allow the 3GB mode (also known as IncreaseUserVA) which increases the user virtual address space to 3 GB and decreases the kernel virtual address space to 1 GB on 32-bit systems.

One of the benefits of having extended pages (e.g 2MB for every page) is that it needs lower amounts of MMPFN. Before start getting deep into the PFN, please remember the term “Page” is mostly used in the operating system level concepts whereas “Frame” is used in CPU Level concepts, therefore “Page” means virtual page and “Page Frame” means physical page.

PFN Lists

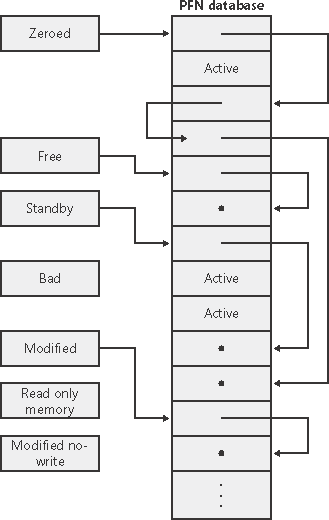
The Page Frame Number consists of lists that describe the state of some pages, there are Active Lists which shows an active page (e.g in working sets or etc), Standby List which means a list that previously backed in the disk and the page itself can be emptied and reused without incurring a disk IO, Modified List which shows that the page is previously modified and somehow must be written to the disk, Freed List, as the name describes, it shows a page that is no longer needed to be maintained and can be freed and finally Zero List that describes a page that is free and has all zeroes (0) in it. A great picture derived from here which shows how the PFN database lists are related to each other :

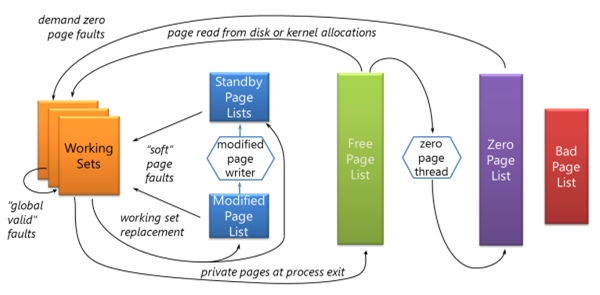
These lists are used to manage memory in “page faults” state in the way that everytime a “page fault” occurs, Windows tries to find an available page form, Zero List, if the list is empty then it gets one from Freed List and zeroes the page and use it, on the other hand, if the Freed List is also empty then it goes to the Standby List and zeroes that page.

The Zero Page Thread

In Windows, there is a thread with the priority of 0 which is responsible for zeroing memory when system is idle and is the only thread in the entire system that runs at priority 0. (which is the lowest available priority because the user threads are at least 1). This thread clears the Freed List whenever is possible. Also, there is a function in Windows called RtlSecureZeroMemory() which frees a location securely but in the kernel perspective nt!KeZeroPages is responsible for freeing the pages. The following picture shows the behavior of zero-thread:

Let’s find the Zero Thread! We know that it comes from system process, its priority is 0, this should be enough and nothing more is needed. First try to find System‘s nt!_eprocess:

1
!process 0 System

Now we can see the System‘s threads, the details of our target thread (zero-thread) are:

1
2
3
4
5
6
7
8
9
10
11
12
13
14
15
16
17
18
19
20
21
22
23
THREAD ffffd4056ed00040  Cid 0004.0040  Teb: 0000000000000000 Win32Thread: 0000000000000000 WAIT: (WrFreePage) KernelMode Non-Alertable
fffff8034637f148 NotificationEvent
fffff80346380480 NotificationEvent
Not impersonating
DeviceMap ffff99832ae1b010
Owning Process ffffd4056ec56040 Image: System
Attached Process N/A Image: N/A
Wait Start TickCount 4910 Ticks: 4 (0:00:00:00.062)
Context Switch Count 21023 IdealProcessor: 3
UserTime 00:00:00.000
KernelTime 00:00:01.109
Win32 Start Address nt!MiZeroPageThread (0xfffff80346144ed0)
Stack Init ffffe700b7c14c90 Current ffffe700b7c14570
Base ffffe700b7c15000 Limit ffffe700b7c0f000 Call 0000000000000000
Priority 0 BasePriority 0 PriorityDecrement 0 IoPriority 2 PagePriority 5
Child-SP RetAddr Call Site
ffffe700`b7c145b0 fffff803`46016f8a nt!KiSwapContext+0x76
ffffe700`b7c146f0 fffff803`46016951 nt!KiSwapThread+0x16a
ffffe700`b7c147a0 fffff803`46014ba7 nt!KiCommitThreadWait+0x101
ffffe700`b7c14840 fffff803`461450b7 nt!KeWaitForMultipleObjects+0x217
ffffe700`b7c14920 fffff803`460bba37 nt!MiZeroPageThread+0x1e7
ffffe700`b7c14c10 fffff803`46173456 nt!PspSystemThreadStartup+0x47
ffffe700`b7c14c60 00000000`00000000 nt!KiStartSystemThread+0x16

As you can see, its start address is at nt!MiZeroPageThread and its priority-level is 0 and if we see the call-stack then we can see nt!MiZeroPageThread was called previously. For more information please visit Hidden Costs of Memory Allocation.

nt!_MMPFN

The Windows structure for PFN is nt!_MMPFN which you can see below :

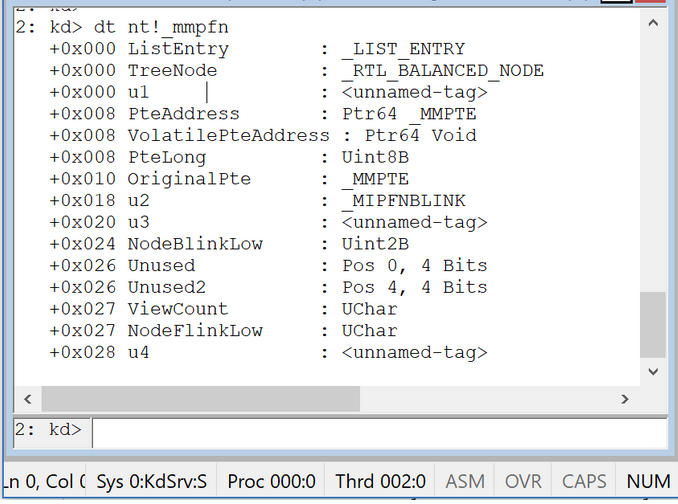
As you see, _MMPFN takes 28 bytes. PFN records are stored in the memory based on their physical address order which means you can always calculate the physical address with the help of PFN.

1
Physical Address = PFN * page size(e.g 4096 Byte) + offset

The address of the PFN database is located at nt!MmPfnDatabase, you can use the following example to get your PFN database address in Windbg.

1
2
2: kd> x nt!MmPfnDatabase
fffff800`a2a76048 nt!MmPfnDatabase = <no type information>

!memusage

Another very useful command in windbg is !memusage, this command gives almost everything about PFN and pages in your memory layout and its corresponding details (e.g files, fonts, system drivers, DLL modules, executable files including their names and their paging bits modifications). A brief sample of this command is shown below :

1
2
3
4
5
6
7
8
9
10
11
12
13
14
15
16
17
18
19
20
21
22
23
24
25
26
27
28
29
30
31
32
33
34
35
36
37
38
39
40
41
42
43
44
45
46
47
48
49
50
51
52
53
54
55
56
57
2: kd> !memusage
loading PFN database
loading (100% complete)
Compiling memory usage data (99% Complete).
Zeroed: 9841 ( 39364 kb)
Free: 113298 ( 453192 kb)
Standby: 105520 ( 422080 kb)
Modified: 7923 ( 31692 kb)
ModifiedNoWrite: 0 ( 0 kb)
Active/Valid: 286963 ( 1147852 kb)
Transition: 45 ( 180 kb)
SLIST/Bad: 567 ( 2268 kb)
Unknown: 0 ( 0 kb)
TOTAL: 524157 ( 2096628 kb)
Dangling Yes Commit: 140 ( 560 kb)
Dangling No Commit: 37589 ( 150356 kb)
Building kernel map
Finished building kernel map
(Master1 0 for 80)
(Master1 0 for 580)
(Master1 0 for 800)
(Master1 0 for 980)
Scanning PFN database - (97% complete)
(Master1 0 for 7d100)
Scanning PFN database - (100% complete)
Usage Summary (in Kb):
Control Valid Standby Dirty Shared Locked PageTables name
ffffffffd 11288 0 0 0 11288 0 AWE
ffffd4056ec4c460 0 112 0 0 0 0 mapped_file( LeelUIsl.ttf )
ffffd4056ec4c8f0 0 160 0 0 0 0 mapped_file( malgun.ttf )
ffffd4056ec4d6b0 0 108 0 0 0 0 mapped_file( framd.ttf )
.....
ffffd4057034ecd0 328 148 0 0 0 0 mapped_file( usbport.sys )
ffffd4057034f0e0 48 28 0 0 0 0 mapped_file( mouclass.sys )
ffffd4057034f7d0 32 28 0 0 0 0 mapped_file( serenum.sys )
ffffd405703521a0 0 20 0 0 0 0 mapped_file( swenum.sys )
.....
-------- 0 20 0 ----- ----- 0 session 0 0
-------- 4 0 0 ----- ----- 0 session 0 ffffe700b8b45000
-------- 4 0 0 ----- ----- 0 session 1 ffffe700b8ead000
-------- 32520 0 84 ----- ----- 1324 process ( System ) ffffd4056ec56040
-------- 2676 0 0 ----- ----- 304 process ( msdtc.exe ) ffffd405717567c0
-------- 4444 0 0 ----- ----- 368 process ( WmiPrvSE.exe ) ffffd405718057c0
-------- 37756 0 60 ----- ----- 1028 process ( SearchUI.exe ) ffffd405718e87c0
.....
-------- 8 0 0 ----- 0 ----- driver ( condrv.sys )
-------- 8 0 0 ----- 0 ----- driver ( WdNisDrv.sys )
-------- 52 0 0 ----- 0 ----- driver ( peauth.sys )
-------- 24744 0 0 ----- 0 ----- ( PFN Database )
Summary 1147852 422260 31692 129996 204428 25156 Total
.....
b45b 64 0 0 60 0 0 Page File Section
b56b 4 0 0 4 0 0 Page File Section
b7ec 84 0 0 64 0 0 Page File Section
b905 12 0 0 0 0 0 Page File Section
bf5c 4 0 0 0 0 0 Page File Section
.....

Note that !memusage takes a long time to finish its probes. What if you want to know more about these pages? The Windbg help document mentioned :

Remarks

You can use the !vm extension command to analyze virtual memory use. This extension is typically more useful than !memusage. For more information about memory management, see Microsoft Windows Internals, by Mark Russinovich and David Solomon. (This book may not be available in some languages and countries.) The !pfn extension command can be used to display a particular page frame entry in the PFN database.

Now we want survey among these command in a more detailed perspective. That’s enough for now… I try to make another part that describes the PFN more practically, so make sure to check the blog more frequently.

This Post is written in cooperation with my friend Sina.

References

[部分翻译] 通过 PTE 欺骗以达到近乎完美的注入效果

Making The Perfect Injector: Abusing Windows Address Sanitization And CoW

我的目标是在这篇博文结尾的时候,制作出一个与众不同的注入器:让你的dll无法被用户模式的调试器调试,让你的内存页对NtQueryVirtualMemoryNtReadVirtualMemory不可见,最后,你的执行代码在目标进程甚至不会有一个句柄。在实现这些操作的同时,我希望它不会触发 patchguard, 并且在目标进程运行时没有驱动运行。

这个目标看起来似乎很蠢,但其实它非常简单,因为windows会帮助我们。

(源码可以在博文底部找到)

0x1:利用Windows地址过滤

当我们把ntoskrnl.exe拖入IDA的时候,我们可以注意一个地址检查

1
2
3
4
5
6
7
8
9
10
11
12
13
14
__int64 __usercall MiReadWriteVirtualMemory@<rax>(ULONG_PTR BugCheckParameter1@<rcx>, unsigned __int64 a2@<rdx>, unsigned __int64 a3@<r8>, __int64 a4@<r9>, __int64 a5, int a6)
{
...
if ( v10 < a3 || v9 > 0x7FFFFFFEFFFFi64 || v10 > 0x7FFFFFFEFFFFi64 )
return 0xC0000005i64;
...
}
__int64 __fastcall MmQueryVirtualMemory(__int64 a1, unsigned __int64 a2, __int64 a3, unsigned __int64 a4, unsigned __int64 a5, unsigned __int64 *a6)
{
...
if ( v12 > 0x7FFFFFFEFFFFi64 )
return 0xC000000Di64;
...
}

有趣的是,操作系统使用硬编码的方式来确保内核内存不会泄露,而这个方式并非CPU用来检查地址是否可以被用户层访问的方式

1
2
3
4
5
6
7
8
9
10
11
12
13
14
15
16
17
18
19
20
21
22
23
24
25
26
27
28
29
30
31
32
33
34
35
36
37
38
39
40
41
42
43
44
45
46
47
48
49
50
51
52
53
54
55
56
57
58
59
60
61
62
63
64
65
66
67
68
69
70
71
72
73
74
75
76
77
78
79
80
81
82
83
84
85
86
87
88
89
90
91
92
93
94
95
96
97
98
99
100
101
102
103
104
105
106
107
108
#pragma pack(push, 1)
typedef union CR3_
{
uint64_t value;
struct
{
uint64_t ignored_1 : 3;
uint64_t write_through : 1;
uint64_t cache_disable : 1;
uint64_t ignored_2 : 7;
uint64_t pml4_p : 40;
uint64_t reserved : 12;
};
} PTE_CR3;
typedef union VIRT_ADDR_
{
uint64_t value;
void *pointer;
struct
{
uint64_t offset : 12;
uint64_t pt_index : 9;
uint64_t pd_index : 9;
uint64_t pdpt_index : 9;
uint64_t pml4_index : 9;
uint64_t reserved : 16;
};
} VIRT_ADDR;
typedef uint64_t PHYS_ADDR;
typedef union PML4E_
{
uint64_t value;
struct
{
uint64_t present : 1;
uint64_t rw : 1;
uint64_t user : 1;
uint64_t write_through : 1;
uint64_t cache_disable : 1;
uint64_t accessed : 1;
uint64_t ignored_1 : 1;
uint64_t reserved_1 : 1;
uint64_t ignored_2 : 4;
uint64_t pdpt_p : 40;
uint64_t ignored_3 : 11;
uint64_t xd : 1;
};
} PML4E;
typedef union PDPTE_
{
uint64_t value;
struct
{
uint64_t present : 1;
uint64_t rw : 1;
uint64_t user : 1;
uint64_t write_through : 1;
uint64_t cache_disable : 1;
uint64_t accessed : 1;
uint64_t dirty : 1;
uint64_t page_size : 1;
uint64_t ignored_2 : 4;
uint64_t pd_p : 40;
uint64_t ignored_3 : 11;
uint64_t xd : 1;
};
} PDPTE;
typedef union PDE_
{
uint64_t value;
struct
{
uint64_t present : 1;
uint64_t rw : 1;
uint64_t user : 1;
uint64_t write_through : 1;
uint64_t cache_disable : 1;
uint64_t accessed : 1;
uint64_t dirty : 1;
uint64_t page_size : 1;
uint64_t ignored_2 : 4;
uint64_t pt_p : 40;
uint64_t ignored_3 : 11;
uint64_t xd : 1;
};
} PDE;
typedef union PTE_
{
uint64_t value;
VIRT_ADDR vaddr;
struct
{
uint64_t present : 1;
uint64_t rw : 1;
uint64_t user : 1;
uint64_t write_through : 1;
uint64_t cache_disable : 1;
uint64_t accessed : 1;
uint64_t dirty : 1;
uint64_t pat : 1;
uint64_t global : 1;
uint64_t ignored_1 : 3;
uint64_t page_frame : 40;
uint64_t ignored_3 : 11;
uint64_t xd : 1;
};
} PTE;
#pragma pack(pop)

如上所示,这是CPU翻译逻辑地址时会用到的结构,而这些众多的标志位则表明着这个逻辑地址的一些属性,在这些属性中,user/supervisor来决定这片内存是否能够被用户层访问。所以与人们想的不一样的是,cpu并非使用

1
Va >= 0xFFFFFFFF80000000

来检查内存访问,而是使用

1
Pte->user & Pde->user & Pdpte->user & Pml4e->user

利用操作系统与cpu检测机制不一样这点,我们可以实现内存对所有用户层api不可见,但它又能够执行在用户模式上。操作非常简单:

1
2
3
4
5
6
7
8
9
10
11
12
13
14
15
16
17
18
19
20
21
22
23
24
25
26
BOOL ExposeKernelMemoryToProcess( MemoryController& Mc, PVOID Memory, SIZE_T Size, uint64_t EProcess )
{
Mc.AttachTo( EProcess );
BOOL Success = TRUE;
Mc.IterPhysRegion( Memory, Size, [ & ] ( PVOID Va, uint64_t Pa, SIZE_T Sz )
{
auto Info = Mc.QueryPageTableInfo( Va );
Info.Pml4e->user = TRUE;
Info.Pdpte->user = TRUE;
Info.Pde->user = TRUE;
if ( !Info.Pde || ( Info.Pte && ( !Info.Pte->present ) ) )
{
Success= TRUE;
}
else
{
if ( Info.Pte )
Info.Pte->user = TRUE;
}
} );
Mc.Detach();
return Success;
}
PVOID Memory = AllocateKernelMemory( CpCtx, KrCtx, Size );
ExposeKernelMemoryToProcess( Controller, Memory, Size, Controller.CurrentEProcess );
ZeroMemory( Memory, Size );

看吧,现在我们有了一个秘密的内存页。

0x2:利用Copy-on-Write

现在我们已经有了一片隐藏的内存了,最后我们需要做的只是让它跑起来。

CoW 是操作系统为了节省内存,让进程共享某些物理内存,直到它的内存数据被改变的时候才重新映射的一种技术

我们知道ntdll.dll是每个进程都会加载的一个链接库,而它的代码段(.text)几乎不会改变,所以为什么要一次又一次地为成百上千个进程分配用于储存它的物理内存呢?

实现非常简单

  1. 如果一个PE文件在其他进程中被映射,并且它的虚拟地址在本进程中并未被使用,那么当本进程映射这个PE文件时,操作系统只会拷贝它的PFN到本进程,并设置这片内存属性为只读。
  2. 如果有指令试图写入这片内存,将会产生一个PageFualt,这个时候操作系统将重新为这片内存分配物理地址空间,并移除只读属性。

这意味着,当我们通过物理内存HOOK一个dll的时候,我们实际上是创建了一个系统范围有效的HOOK。

我们选择HOOK一个常用的API:TlsGetValue

因为PML4E在各个进程间是不同的,因此我们不能直接跳转到我们的隐藏内存,我们可以在KERNEL32.DLL找到一片区域用于执行检查PID的代码:

1
2
3
4
5
6
7
8
9
std::vector<BYTE> PidBasedHook =
{
0x65, 0x48, 0x8B, 0x04, 0x25, 0x30, 0x00, 0x00, 0x00, // mov rax, gs:[0x30]
0x8B, 0x40, 0x40, // mov eax,[rax+0x40] ; pid
0x3D, 0xDD, 0xCC, 0xAB, 0x0A, // cmp eax, TargetPid
0x0F, 0x85, 0x00, 0x00, 0x00, 0x00, // jne 0xAABBCC
0x48, 0xB8, 0xAA, 0xEE, 0xDD, 0xCC, 0xBB, 0xAA, 0x00, 0x00, // mov rax, KernelMemory
0xFF, 0xE0 // jmp rax
};

因为PE始终是0x1000对齐的,所以找到一片35字节的可用区域非常简单。

最后,添加上收尾代码,确保我们的HOOK只执行一次,并且在执行前恢复HOOK。

1
2
3
4
5
6
7
8
9
10
11
12
13
14
15
16
17
std::vector<BYTE> Prologue =
{
0x00, 0x00, // data
0xF0, 0xFE, 0x05, 0xF8, 0xFF, 0xFF, 0xFF, // lock inc byte ptr [rip-n]
// wait_lock:
0x80, 0x3D, 0xF0, 0xFF, 0xFF, 0xFF, 0x00, // cmp byte ptr [rip-m], 0x0
0xF3, 0x90, // pause
0x74, 0xF5, // je wait_lock
0x48, 0xB8, 0xAA, 0xEE, 0xDD, 0xCC, 0xBB, 0xAA, 0x00, 0x00, // mov rax, 0xAABBCCDDEEAA
// data_sync_lock:
0x0F, 0x0D, 0x08, // prefetchw [rax]
0x81, 0x38, 0xDD, 0xCC, 0xBB, 0xAA, // cmp dword ptr[rax], 0xAABBCCDD
0xF3, 0x90, // pause
0x75, 0xF3, // jne data_sync_lock
0xF0, 0xFE, 0x0D, 0xCF, 0xFF, 0xFF, 0xFF, // lock dec byte ptr [rip-n]
0x75, 0x41, // jnz continue_exec
0x53, // --- start executing DllMain ---

至此,所有的工作都完成了。我们成功注入了并隐藏了dll。通过一个系统范围有效的HOOK来确保在目标进程执行前驱动程序就可以卸载。

源码

省略了一些细枝末节,此文核心是PTE欺骗,至于后面通过COW劫持线程,个人认为实用性不大。

关于定位随机化的pte base

1
2
3
4
5
6
7
8
9
10
11
12
13
14
15
16
17
18
19
20
21
LONG64 MmGetVirtalPteBase()
{
LONG64 pte_base = 0;
PHYSICAL_ADDRESS cr3_pa = { __readcr3() & 0xfffffffffffffff0 };
PTE* page_directory_va = static_cast<PTE*>(MmGetVirtualForPhysical(cr3_pa));

if (page_directory_va)
{
for (auto index = 0; index < 512; index++)
{
if (page_directory_va[index].page_frame == (cr3_pa.QuadPart >> 12))
{
pte_base = (index + 0x1FFFE00i64) << 39;

break;
}
}
}
return pte_base;
}

本质上是利用了页表自映射机制,通过找到指向当前cr3的index,有如下规律 index : 512 == ptebase_va : 0xffffffffffff,代入计算即可得pte base。pxe base 等同理。